
If you’re not familiar with QR Codes, pull up a chair, pour yourself a warm cider and follow along – you’ll be amazed and excited to get one of these onto your project!
 This is a QR Code. It stands for Quick Response. It is a symbol that your cell phone can read and direct your browser to a specific place on the internet. You can create them FREE! You can search online for sites that will allow you to create a QR code. The site I like best is http://www.qrstuff.com/. There you will find a step-by-step process to create your unique QR code.
For this example, we will create a QR code that will link to my website: WendyAmato.com. First, use the link above to go to the home page of QRstuff.com. Under Step 1 “Data Type”, choose Website URL since we want the QR code to link to a specific page of a website. Next, in Step 2 “Content”, type or copy and paste the exact web address that you want to link to – in this case http://www.wendyamato.com/. Step 3 “Foreground Colour” is where you get to choose what color you would like your QR Code to be generated in. If you’re planning on printing in color – go crazy and pick something fun (maybe your logo color??? :)). If you’re planning on printing only in black and white, be sure to choose black (in the bottom left or right corner of the current color chart).
Your QR Code preview shows on the right. You can now choose to download, print or email your unique code. I always download and save the code to my computer so I can use it how I wish, when I wish. If you choose “Print”, you will be prompted to set up your printer and paper right then. You may not be ready for this step so it’s a good idea to “Download” instead. You will be prompted to choose where you would like to save the file. Notice the file is a .png, not a .jpg. To change it to a .jpg, I opened up the .png file in Photoshop Elements, then clicked Image, Mode, RGB Color. Next, I saved it as a .jpg.
Now, if you’d like to have your QR Code link to a video on YouTube, simply choose YouTube Video in Step 1!
Woo hoo! Now you have a unique QR Code that you can use on your scrapbook layout, print and stick to the back (or front!) of your business card, sneak into your child’s lunch bag or do with however you choose.
To view the webpage that your QR Code links to, you will need a QR Code reader App on your cell phone or tablet. Again, there are many free ones out there. ScanLife and QRReader are two that I have used. Once you open the app, your camera feature will turn on and you simply hover over the QR Code until it registers. You will be asked if you would like to go to that website. Yes!
So give this a try. It would be fun to add one to your holiday cards! Here’s one I made using my favorite, Persnickety Prints, to create a quick and easy card:
 I saved the QR Code as a .jpg file and simply dropped it into the greeting card template just like a photo. I even made it red in Step 3! My QR Code links to a song on iTunes – “Have Yourself a Merry Little Christmas” by Little Big Town! Step 1 will walk you through the process if you choose “iTunes Link”.
Get creative! You could take a fun video of the kids decorating the tree or sledding! Link to your family photo share site! So many possibilities! Have fun and let me know what you come up with!
 I started by cutting all the t-shirts down to size. I cut both the front and the back of each t-shirt at the same time with my
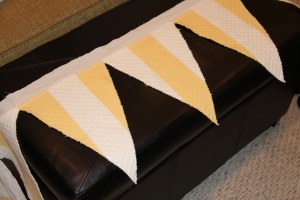
 I stitched both diagonals to hold the batting in place. If I had to stitch over a large area of screenprinting, I stitched on top of a piece of paper so the presser foot wouldn’t get stuck on the ink.
 Next, I laid all the squares out on the floor to determine their placement so no two similar colors would be touching, if possible. Starting with the top row of squares, I seemed the squares together with wrong sides facing so that the seem would be on the front of the quilt. I used a 1″ seam allowance. When I finished all the rows, I seamed each row to the next using the same procedure again with a 1″ seam allowance.
 Next, I used my favorite
  Once that process was complete, my T-shirt Quilt #2 was finished! Much easier than the first! Give it a try – you know you have the t-shirts!


 I know. I know. It’s November 30th and I’m just starting NOW. Well, when I first signed on to the project, I picked my album base from my vast stash and even picked a pad of 6″x6″ paper to use so technically, I started about 2 months ago. Today’s the day, no more procrastinating. Here goes:
 I dug deep into my old office tool box and used an adjustable hole punch to match the holes for the spine rings. Love those old office tools and supplies! They don’t make ’em like they used to.
 Stashes are wonderful things. So much better for me than a closet full of shoes! Need red and green? No problem. Need sparkly? No problem. Ribbon, flowers, brads, plastic, glitter spray, ink??? Check! This project is starting out to be more fun than I anticipated and I’m not even at Day One yet!
  Stay tuned for my next post to see how I’ve put all this together to begin creating something wonderful.
 Next, I painted Liquitex Matte Medium (craft stores in the paint aisle) onto muslin with a sponge brush. I had to work fast since it seemed like it would dry fast. I only painted the muslin in the areas where printing would be. Why waste the good stuff? I placed the transparency onto the muslin, ink side down and used the bottom of a Sharpie to emboss. I pressed hard but could also see which areas I had done since I was working under bright lights. The air bubbles disappeared in the areas I rubbed.
 This resulted in a piece of muslin that had some sheen to it wherever the medium was painted on. It dried a bit shiny (and stiffer) in most places. Probably would go with a silk-screener for the wedding but I still like this technique and hope to find a really cool use for it. Perhaps on an already-made fabric album cover or a ready-made tote bag. Anything that wouldn’t lay flat for a silk-screen machine! I want to try it with a photograph, too!
 With the wings, hats and swords safely stored, my attention turned to Captain Hook’s coat. It needed to be grand and swirly and gold (with some red would be nice, too!). I went to the library and checked out books on costumes and found a picture of just what I was envisioning! I went to JoAnn’s and found the perfect pattern for $12 (Simplicity #3677). On my search for other costume parts, I was walking the aisles at Goodwill and a bedspread caught my eye. It was perfect! It was $5!!! I was so giddy at the checkout that I’m sure the cashier was wondering why on earth I was getting so excited about a dirty old bedspread! It was king size, gold and red brocade and had yards and yards of gold and red rope trim. Jackpot! I made a trip into the city to my favorite discount fabric warehouse (
 A bit of sewing magic (thanks again, Mom, for teaching me how to sew instead of cook!) and here it is! Captain Hook’s Coat. I even had enough fabric left over to make a cape for Peter Pan, complete with lining and rope trim edging. I’ll save Peter Pan and Tinker Bell’s costumes for another post.
 I’m always looking for a fun way to wrap a present. Here’s what I’m up to lately:
 OXO Smooth Edge Can Opener – cuts the side of the can thus taking off the end of the can without any sharp edges.
 I found this little gem of a book at
  Some of the catagories:
 …play dress-up.